Now that we have covered the introductory part in the past five tutorials, let us get into some real UFT action. It’s time to record our first UFT script.

We will use the demo web application provided by HPE to record our first script. This script will serve as a basis for future lessons.
We would use the latest version of Windows i.e. Windows 10 and latest stable version of Internet Explorer i.e. IE 11 for our tutorials. Having said that, this UFT tutorial series would work on all configurations supported by the latest version of UFT. Check UFT support matrix for compatibility of UFT with Windows and browsers.
Before you start recording your script please make sure these things are in order.
- Ensure BHO manager extension is enabled in Internet Explorer browser. (We would not use Microsoft Edge for tutorial purposes.)
- UAC is turned off on your machine.
- Microsoft Script debugger is installed.
How to Launch UFT?
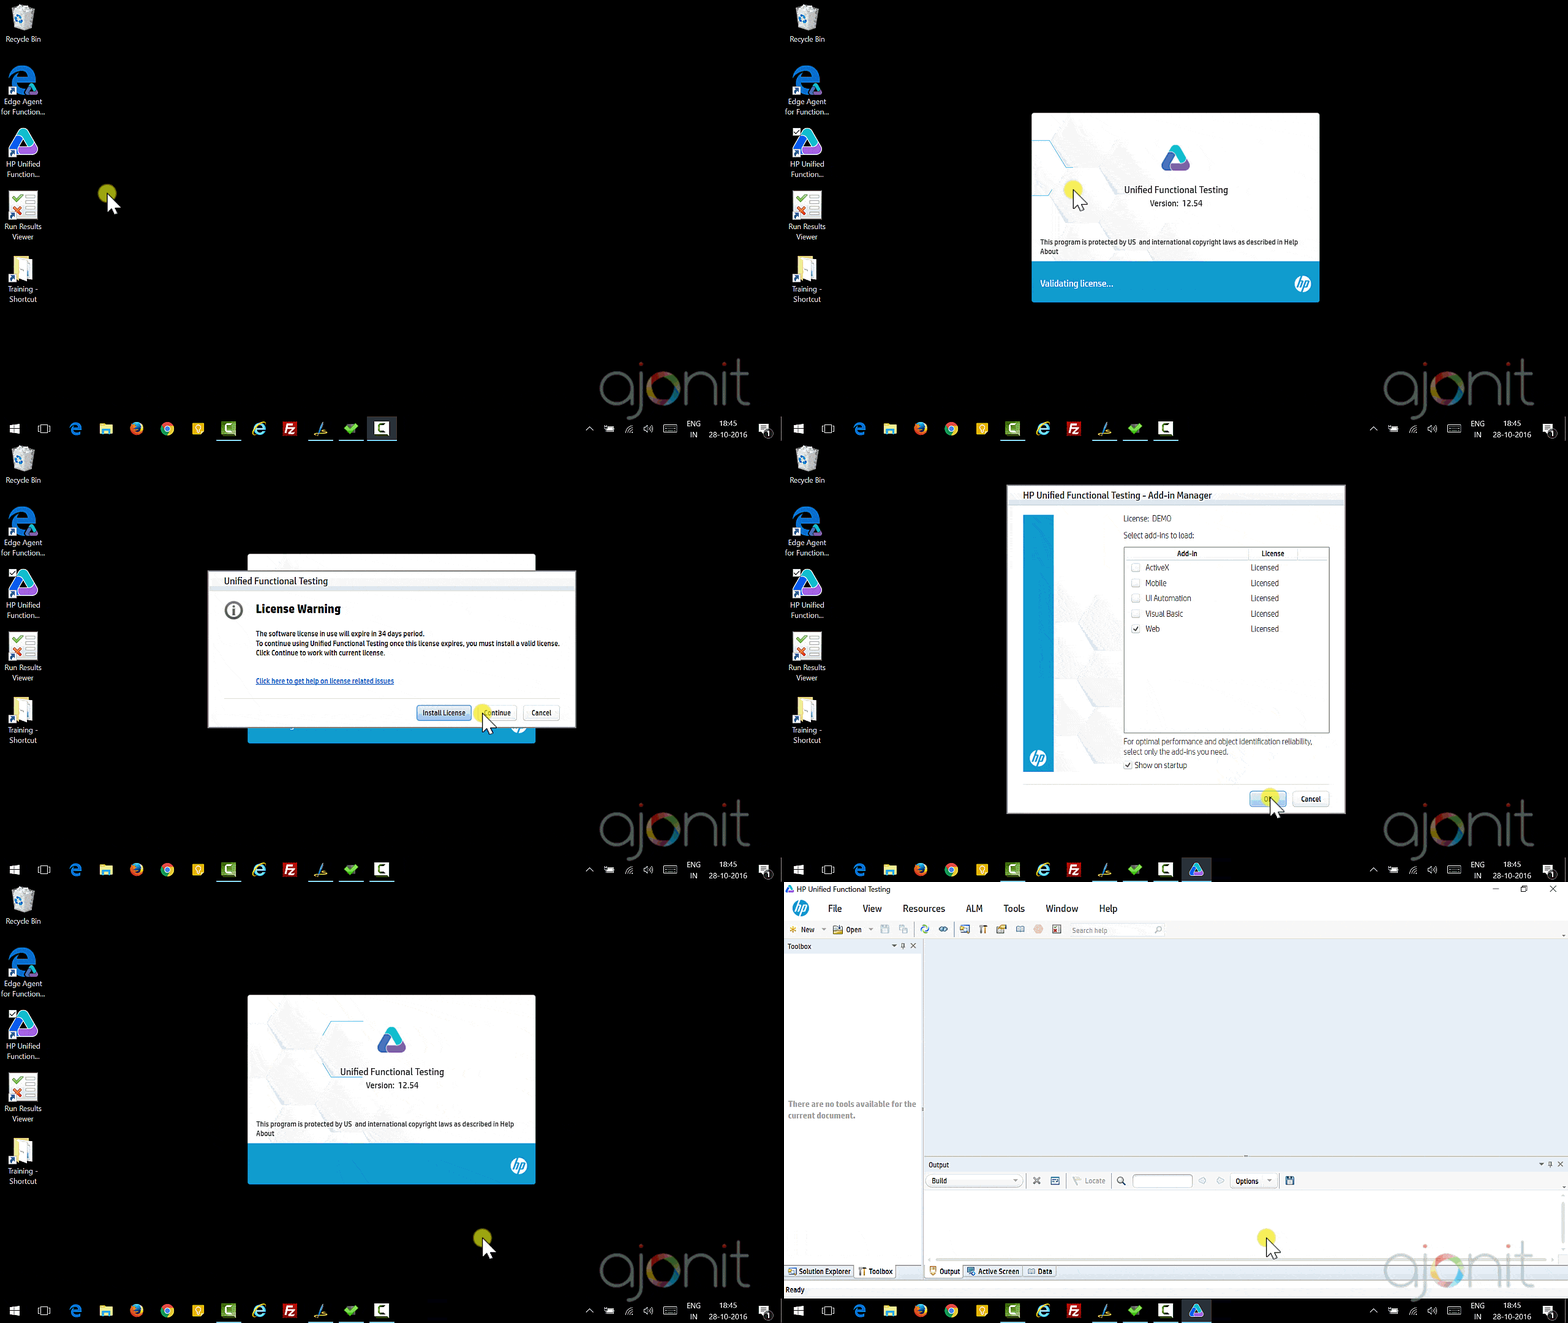
- Double Click on the UFT icon present on your desktop.
- If you are running a trial version, Press
Continuebutton when prompted to install license. - On the next dialog-box, ensure Web add-in is selected.
- Press
Continuebutton again.
All the above steps are shown in the illustration below.
How to create a new UFT test?
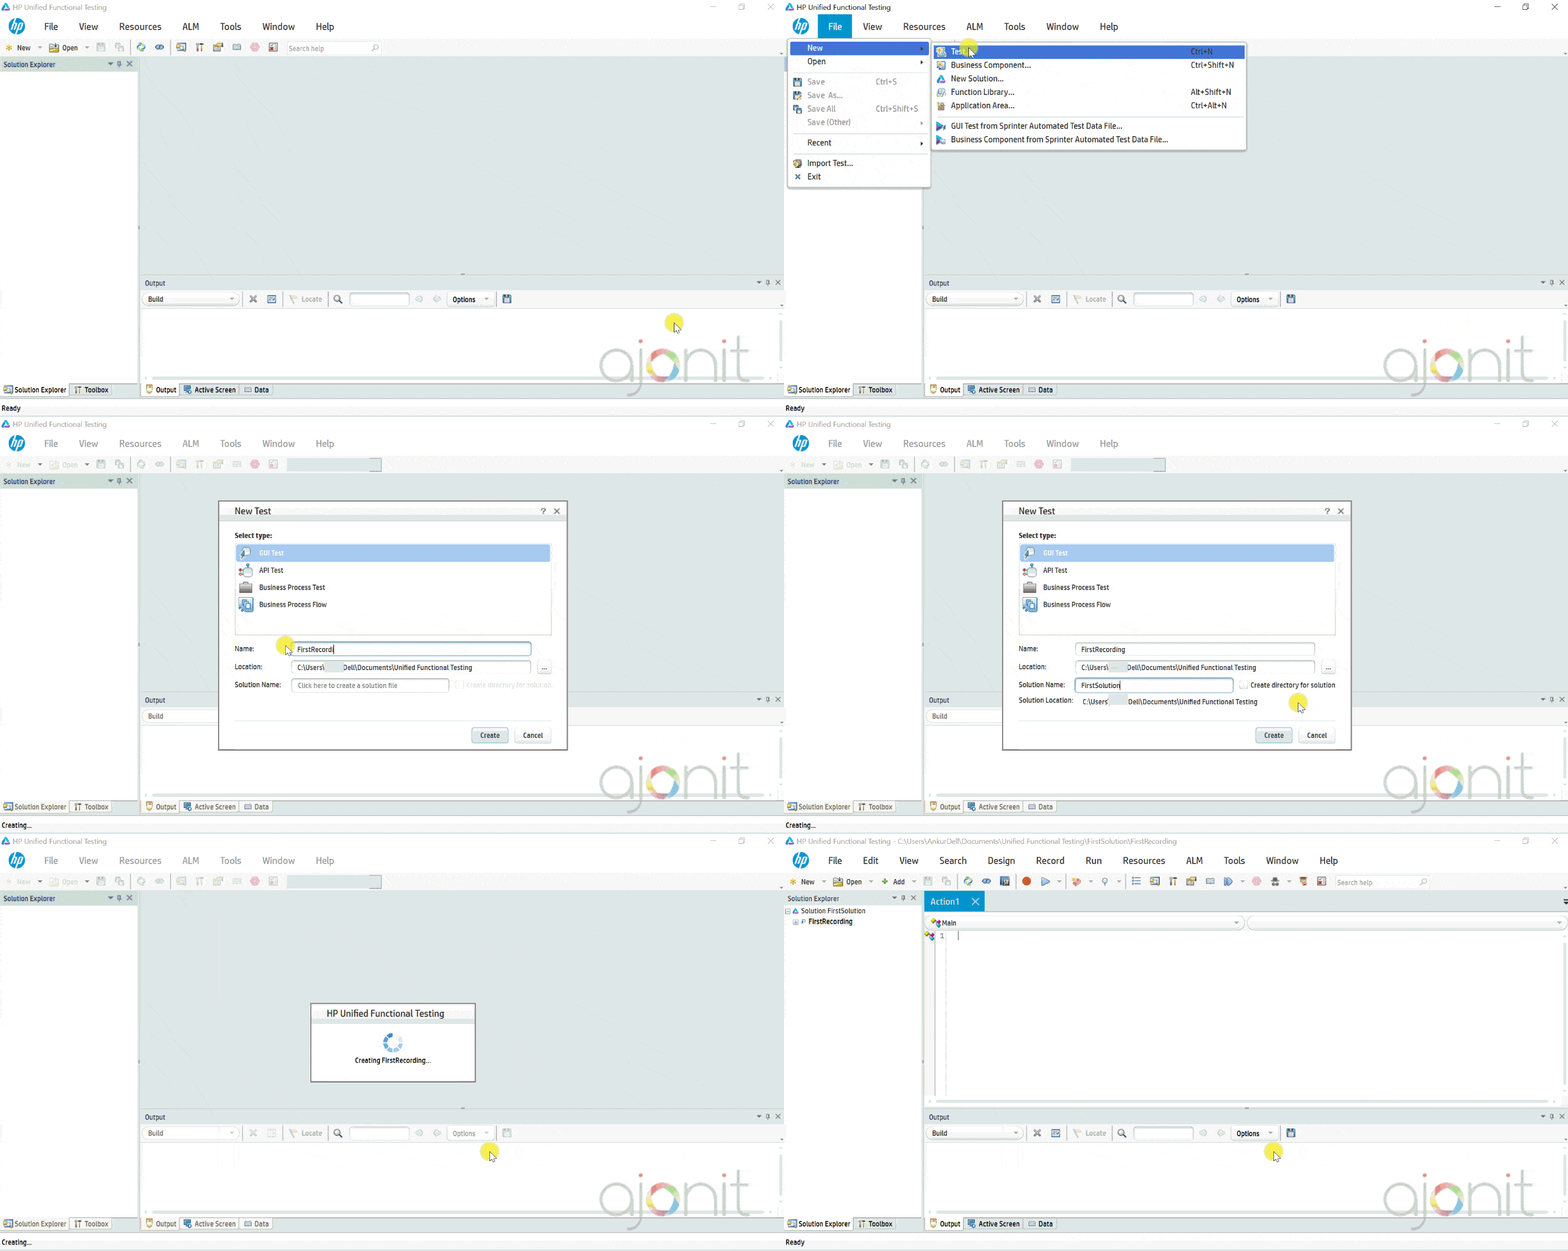
Now that you are inside the IDE, here is how you can create a new test in UFT.
- Go to File > New > Test
- Select
GUI Test - Give your Test a meaningful name.
- Give your Solution a meaningful name.
- Click
Create.
All the above steps are shown in the illustration below.
How to record your first UFT script?
We will record a very simple script where we will navigate to the web based flight application, enter the credentials, select various flight details and logout.
- Click on the record button present in the UFT IDE on the toolbar at the top.
- A dialog box would pop-up, make sure that under
Record>Record and Run Settings…,Record and run on any open browseris selected. - Launch the Internet Explorer browser.
- Start entering the information as you would normally do when you visit a website. Enter the URL.
- To login, fill-in the
username/passwordasmercury/mercury. - Enter the information on the subsequent pages (thinking of yourself as a user who is booking a flight ticket.)
- Logout from the application and close the browser.
All the above steps are shown in the video below.
Here is an extract from the video above.
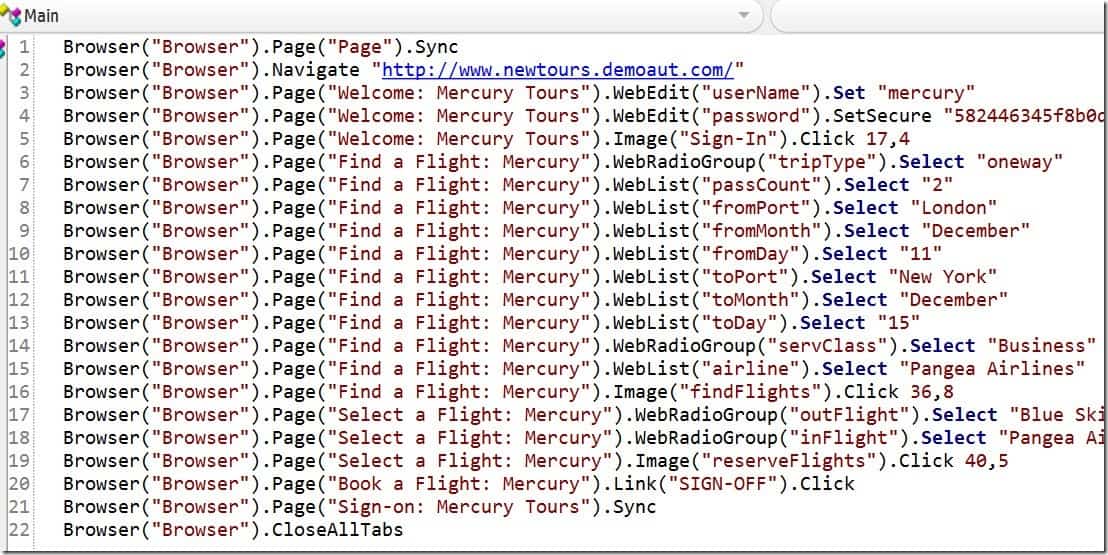
This is the raw script generated by UFT. It consists of entire activity we undertook after hitting the record button. Let us understand the statements recorded as shown in the screenshot above, one-by-one.
Line #1: When we double clicked on the IE browser icon, UFT inserted this statement in Editor to synchronize the browser. This is helpful during script replay-time. We will add a statement above it after a while to emulate the clicking on IE icon so that we can launch the browser automatically without user intervention.
Line #2: We are navigating to the demo website.
Line #3 – #4: As you can see, the statements generated are quite self-explanatory. For a web based application, they always start with a Browser object, then they nest a Page object below it, which subsequently nests the object in which you are performing some action. In these lines, we are entering user credentials under WebEdit object.
Line #5 – #21: These lines too follow the similar behavior as explained above. They are emulating the exact behavior what we performed on the flight reservation application.
Line #22: Here we close the browser.
If you try to replay this script, it will run fine except one problem. It won’t be able to open the IE browser by itself. To open the browser automatically as soon as we hit the Run button, we will put this statement at the top.
SystemUtil.Run "C:\Program Files\Internet Explorer\iexplore.exe"
Our script would now look like
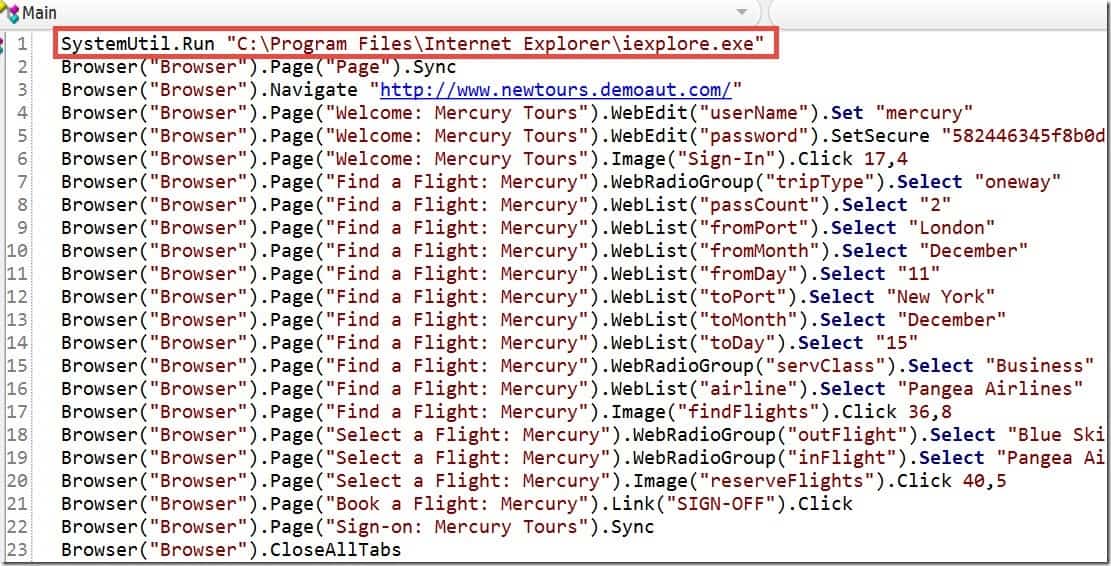
Now you can replay the script by clicking on the play button and all the recorded actions will be replayed without any issues.
That’s how you can record a simple script in UFT. We trust you have understood the statements in the script shown above. We would strongly suggest you to try it once yourself to get a hang of it.
In the next tutorial we will discuss in detail about objects. For someone new to programming and UFT , you need to have a thorough grasp of this concept.
Make sure you enter your name and address below to receive the next tutorial as soon as it is ready.
Here is the complete set of tutorials we have covered till now in the UFT tutorial series:
- Tutorial 1: Introduction to software testing
- Tutorial 2: Introduction to UFT
- Tutorial 3: UFT Add-ins and Add-in Manager
- Tutorial 4: All About UFT Menus
- Tutorial 5: Complete Guide to UFT Panes
- Tutorial 7: Ultimate Guide to Classes and Objects in UFT


