This is Part8 and last in series of QTP and DotNetFactory series by Saket. Refer Part1, Part2,Part3, Part4, Part5, Part6, Part7

XML stands for Extensible Markup Language. It a markup language very much similar to HTML but not with predefined tags, used for encoding documents electronically. It has become a very popular means to exchange structured data.
There are several methods in QTP to work with XML file like using XMLUtil, and MSXML. In this article you will learn how to interact with XML files using DotNetFactory in QTP.
Here is an excerpt of sample XML file (books.xml) from msdn. This XML will be used for all the examples in this article.
- <?xml version="1.0"?>
- <catalog>
- <book id="bk101">
- <author>Gambardella, Matthew</author>
- <title>XML Developer's Guide</title>
- <genre>Computer</genre>
- <price>44.95</price>
- <publish_date>2000-10-01</publish_date>
- <description>An in-depth look at creating applications with XML.</description>
- </book>
- <book id="bk102">
- <author>Ralls, Kim</author>
- <title>Midnight Rain</title>
- <genre>Fantasy</genre>
- <price>5.95</price>
- <publish_date>2000-12-16</publish_date>
- <description>A former architect battles corporate zombies, an evil sorceress, and her own childhood to become queen of the world.</description>
- </book>
- <book id="bk103">
- <author>Corets, Eva</author>
- <title>Maeve Ascendant</title>
- <genre>Fantasy</genre>
- <price>5.95</price>
- <publish_date>2000-11-17</publish_date>
- <description>After the collapse of a nanotechnology society in England, the young survivors lay the foundation for a new society.</description>
- </book>
- </catalog>
To work with using DotNetFactory in QTP we will use ‘System.XML’ namespace, which provides standards-based support for processing xml and we can use different classes for different operations like XMLDocument, XMLTextReader, XMLTextWriter etc.
Let us now see how we can do various operations with xml.
Reading a XML document
To Read the XML file we will use ‘XMLReader’ class, which provide a read only access to a stream of XML data. We will use ‘System.XML.XMLReader’ as type and ‘System.XML’ as assembly.
Set MyXMLReader = DotNetFactory.CreateInstance ("System.XML.XMLReader", "System.XML")
To read a particular xml file, we can use ‘Create’ method which creates a new instance of XMLReader with the specified XML file. Once the xml is initialized we can use ‘Read’ method to read the first node.
- Set oXML=MyXMLReader.Create("C: \Books.xml")
- oXML.Read
XML Documents always form a tree structure starting with a root and branches to leaves. In the above sample xml document the first line the XML declaration which defines the XML version.
XML Declaration will always have the node type as ‘XMLDeclaration’ and root and other leaves will have the node type as ‘Element’. Use ‘NodeType’ property to get the type of node in xml document. There are several other properties as well which we can use here like
Name – gives the qualified name of the current node.
HasValue – gives a value, whether the current node has the value.
AttributeCount – gives the number of attributes in the current node
Example 29
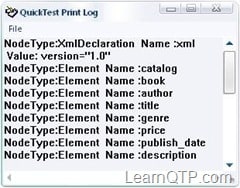
- Set MyXMLReader = DotNetFactory.CreateInstance("System.Xml.XmlReader", "System.Xml")
- Set oXML=MyXMLReader.Create("D:\My QTP\DNFXML\Books.xml")
- while (oXML.Read())
- If oXML.NodeType = "XmlDeclaration" or oXML.NodeType = "Element"Then
- print "NodeType:"&amp;oXML.NodeType &amp;" Name :"&amp; oXML.Name '&amp; " is at Depth:"&amp; oXML.Depth
- If oXML.HasValue Then
- Print " Value: "&amp; oXML.Value
- End If
- End if
- wend
- oXML.Close()
- Set oXML = Nothing
- Set MyXMLReader = Nothing
This will return you the XML Declaration and all the elements in the xml document.

Now to get the attributes we will use ‘GetAttribute’ method, which returns the value of an attribute. It requires two parameter Node Local name and namespace uri.
oXML.GetAttribute(oXML.Name, oXML.NamespaceURI)
to move through each attribute, we can MoveToNextAttribute method.
Example 30
- Set MyXMLReader = DotNetFactory.CreateInstance("System.Xml.XmlReader", "System.Xml")
- Set oXML=MyXMLReader.Create("D:\My QTP\DNFXML\Books.xml")
- while (oXML.Read())
- If oXML.NodeType = "XmlDeclaration" or oXML.NodeType = "Element"Then
- print "NodeType:"&amp;oXML.NodeType &amp;" Name :"&amp; oXML.Name '&amp; " is at Depth:"&amp; oXML.Depth
- If oXML.HasValue Then
- Print " Value: "&amp; oXML.Value
- End If
- print "No. of Attributes : " &amp; oXML.AttributeCount
- If oXML.AttributeCount &gt; 0 Then
- While oXML.MoveToNextAttribute()
- LocalName = oXML.Name
- NURI = oXML.NamespaceURI
- Print "Attribute : " &amp; LocalName &amp; " Value : " &amp; oXML.GetAttribute(LocalName,NURI)
- wend
- end if
- end if
- wend
- oXML.Close()
- Set oXML = Nothing
- Set MyXMLReader = Nothing
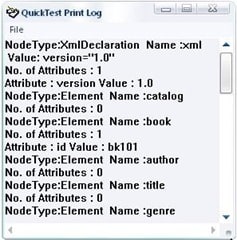
This will return you the elements with attribute values.

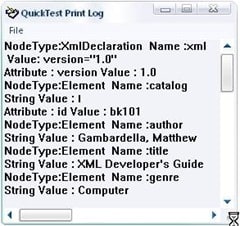
You can see here we have got the values for book id but not for author, title, genre etc.
To get these values we use ‘ReadString’ method
Example 31
- Set MyXMLReader = DotNetFactory.CreateInstance("System.Xml.XmlReader", "System.Xml")
- Set oXML=MyXMLReader.Create("C: \Books.xml")
- while (oXML.Read())
- If oXML.NodeType = "XmlDeclaration" or oXML.NodeType = "Element"Then
- print "NodeType:"&amp;oXML.NodeType &amp;" Name :"&amp; oXML.Name '&amp; " is at Depth:"&amp; oXML.Depth
- If oXML.HasValue Then
- Print " Value: "&amp; oXML.Value
- End If
- If oXML.NodeType = "Element" Then
- Print "String Value : " &amp; oXML.ReadString
- End If
- If oXML.AttributeCount &gt; 0 Then
- While oXML.MoveToNextAttribute()
- LocalName = oXML.Name
- NURI = oXML.NamespaceURI
- Print "Attribute : " &amp; LocalName &amp; " Value : " &amp; oXML.GetAttribute(LocalName,NURI)
- wend
- end if
- end if
- wend
- oXML.Close()
- Set oXML = Nothing
- Set MyXMLReader = Nothing
This will return you all the elements and their values

Now, as you have learnt to read a XML document, we will quickly see how to create a xml document
Create XML
For Creating XML we will use XMLWriter Class, System.XML.XMLWriter as type name and System.XML as Assembly.
- Set MyXMLWriter = DotNetFactory.CreateInstance("System.Xml.XmlWriter", "System.Xml")
Same as Reader we can use ‘Create’ method which creates a new instance of XMLWriter with the specified XML file.
Set oXml=MyXMLWriter.Create("C:\Test.xml")
We use different methods to create the xml data
WriteStartElement – writes the specified start tag
WriteEndElement – writes the specified end tag
WriteAttributeString – writes an attribute with specified value
WriteElementString – wites an element with specified value
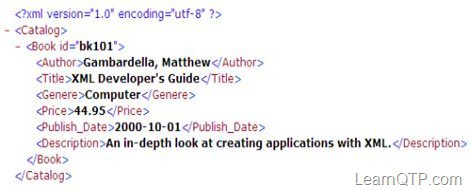
So if you need to create a XML as above document the script will be
Example 32
- Set MyXMLWriter = DotNetFactory.CreateInstance("System.Xml.XmlWriter", "System.Xml")
- Set oXml=MyXMLWriter.Create("C:\Test.xml")
- oXml.WriteStartElement("Catalog")
- oXml.WriteStartElement("Book")
- oXml.WriteAttributeString "id", "bk101"
- oXml.WriteStartElement("Author")oXml.WriteString "Gambardella, Matthew"
- oXml.WriteEndElement()
- oXml.WriteStartElement("Title")
- oXml.WriteString "XML Developer's Guide"
- oXml.WriteEndElement()
- oXml.WriteStartElement("Genere")
- oXml.WriteString "Computer"
- oXml.WriteEndElement()
- oXml.WriteStartElement("Price")
- oXml.WriteString "44.95"
- oXml.WriteEndElement()
- oXml.WriteStartElement("Publish_Date")
- oXml.WriteString "2000-10-01"
- oXml.WriteEndElement()
- oXml.WriteStartElement("Description")
- oXml.WriteString "An in-depth look at creating applications with XML."
- oXml.WriteEndElement()
- oXml.WriteEndElement()
- oXml.WriteEndElement()
- oXml.close()
- Set oXML = Nothing
- Set MyXMLWriter = Nothing
This will return you the required xml

Thank You Saket for sharing your knowledge with the QTP community. I’m sure this exhaustive series on DotNetFactory will be of immense help to all of us.


Hi when i use WriteProcessingInstruction methord using document object, my whole file indentation gets corrupted and all xml nodes are writen in same single line. Resulting in an error while parsing with xml parser!
Please help with this. Code is as below-
Set MyXMLWriter = DotNetFactory.CreateInstance(“System.Xml.XmlWriter”, “System.Xml”)
Set Settings =DotNetFactory.CreateInstance(“System.Xml.XMLWriterSettings”, “System.Xml”)
Settings.Indent = true
Set oXml=MyXMLWriter.Create(“N:\Automation\Results\Test.xml”,Settings)
oXml.WriteProcessingInstruction “xml-stylesheet”,”type=””text/xsl”” href=””PDetails_Lib.xsl”””
oXml.WriteStartElement(“Report”)
…..
…..
Any help with be appreciated… thankx
i am reading data from oracle database and the values are in arabic language, QTP is reading that values in some different format.
Actual Data is: وأضاف ديوكوفيتش لقب
QTP Returning Value: æÃÖÇÝ ÏíæßæÝíÊÔ áÞÈ
Need to conpare this araboc data from excel. Any solutions to read data in Arabic language only.
How would I go about adding a new line in qtp after each element
Hi Bruce,
One of the way could be to go through all the nodes in the xml and change the required and save. can you elaborate your requirement and post it at QTP Forums?
Hi Saket,
Thanks for a fantastic article
I Have a question . How can we modify only some fields in XML ?
Hi Miken,
is there anything specific you need to put it this way?the second parameter required for createinstance is actually the namespace and it bydefault loaded, there is no need to put the complete path here. you should use this way to call an assemble which is not loaded may be in the case when you wan tot use your custom .net dll.
Using QTP 9.5 and am unable to load System.XML.XMLreader with statement Set MyXMLReader = DotNetFactory.CreateInstance (“System.XML.XMLReader”, “C:\WINDOWS\assembly\System.XML”). System.XML is present in windows assembly. any ideas why?
Hi ,
I am testing application having WPF (windows presention Foundation) Controls.I am using qtp 10.0 with add-ins .Net and WPF . but WPF controls does not get recognize by QTP. Can u pls tell me what are the settings are required..
Thanks
Mahesh Kothale
not sure if this is where it’s supposed to go, i have this
Browser(“Emptoris Contract Management”).Window(“Search Contract Templates — Webpage Dialog”).Page(“Search Contract Templates_2”).Frame(“content”).WebElement(“WebTable”).Click
but when i execute it i get an error. any idea what’s wrong?
Hi Sacket /Karthik
Can you please correct the code as mentioned by Karthikeyan and publish please.THANKS
Regards
Radha
hi Soumya,
may be you can read nodes from the xml first and then replace your modified string wherever required.
Yes Karthikeyan, you are right. we will definitely take care of this in future. Thanks
Hi Saket,
Thanks for a fantastic article
I Have a question . How can we modify only some fields in XML ?
If we need to create more number of branches to each element what is the procedure to do it. If you can explain that it will be of good use.
Some of the code examples have typo in it. VB operators like & are replaced by their XML counterparts. For example
If a & gt; b Then
Which is supposed to be
If a>b Then
Some of the code examples have typo in it. VB operators like & are replaced by their XML counterparts. For example
If a > b Then
Which is supposed to be
If a>b Then