This is Part2 of QTP and DotNetFactory series by Saket. In case you have missed the first part you can refer it via this link Part1: QTP and DotNetFactory – Basics

In Part1 of this series we discussed the basics of DotNetFactory, why DOTNetFactory and how to use it with a simple example of creating your own custom message box. In this part you will learn to create a custom user form using DotNetFactory utility object in QTP.
Before we proceed, give a thought why you will need to have a user form in your script? What can we do by creating a user form?
Consider a case where you need to run your part of your script based on an input data from the user. In such case, it will be better if you can create an interface to interact with your script and so you will need a user form.
I have seen many such scenarios on various forums where users wanted to have an option(checkbox, radiobuttons etc) to proceed, like the recent query on QTP forums
To create a custom user form again we will use the same Set Statement to retrieve the COM Interface using CreateInstance, but this time with a different type name. We will use System.Windows.Form as type name and the same assembly (System.Windows.Forms) as Form is also a part of same namespace.
Set MyForm = DotNetFactory.CreateInstance("System.Windows.Forms.Form","System.Windows.Forms")
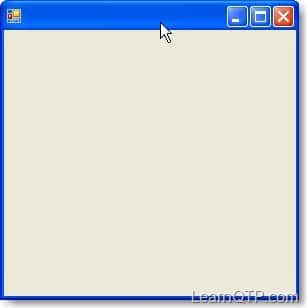
Now, we have already created the custom user form, the only thing remaining is to display the form. A form has two methods to display Show and ShowDialog. The only difference between the two is when you use ShowDialog then QTP waits until you perform an event on your user form.
We will use ‘Show’ Method first in the example. Show method for a Form does not accept arguments like Message box.
MyForm.Show
That’s it, and your user form will be displayed. Below is the complete code
Example 3
- Set MyForm = DotNetFactory.CreateInstance("System.Windows.Forms.Form","System.Windows.Forms")
- MyForm.Show
In the same way, you can display using ‘ShowDialog’
Example 4
- Set MyForm = DotNetFactory.CreateInstance("System.Windows.Forms.Form","System.Windows.Forms")
- MyForm.ShowDialog
This gives you output as

From the above example, you are now able to display a user form. But isn’t it seems like it is incomplete and we missed something. Yes, a user form must have a title (caption) and some controls on it to interact. So now we will add a title to the form. We will learn to create the different controls on it on later parts in this series.
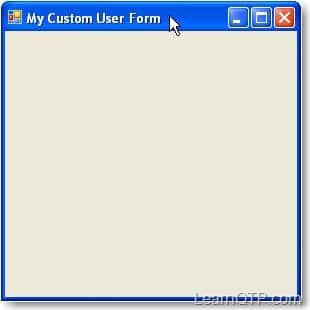
To add a title to the user form, we have Text property of Form to use, which will enable to add a title of the custom user form using
MyForm.Text = “My Custom User Form”
Below is the complete code
Example 5
- Set MyForm = DotNetFactory.CreateInstance("System.Windows.Forms.Form","System.Windows.Forms")
- MyForm.Text = "My Custom User Form"
- MyForm.Show
This will give you output as

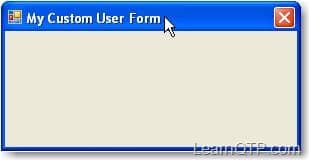
Similarly you can use other properties of form as well. For example you can use
Maximizebox – used to hide the miximize button at top right of the form
Minimizebox – used to hide the minimize button at top right of the form
Height – to set the height of form
Width – to set the width of form
Location – to set the location to display on screen, etc
Below is the code that uses properties mentioned above:
Example 6
- Set MyForm = DotNetFactory.CreateInstance("System.Windows.Forms.Form","System.Windows.Forms")
- MyForm.Text = "My Custom User Form"
- MyForm.Maximizebox = False
- MyForm.Minimizebox = False
- MyForm.Width = 300
- MyForm.Height =150
- MyForm.Location.X = 100
- MyForm.Location.Y = 200
- MyForm.Show
This above code will give you the output as

Note: When working with such scenarios (mentioned above), always use the ShowDialog method to display the form, as we need to have some input from the user to proceed further with our script.
In the next part of series we will add some controls to the form created above.


Hi – Iam using QTP 11.0
Iam looking to add a vertical and horizontal scrollbar into a form which has many checkboxes in it.
I have this code in a function which adds all the checkboxes in a form
Set MyForm = DotNetFactory.CreateInstance(“System.Windows.Forms.Form”, “System.Windows.Forms”)
Set MyCheckbox1 = DotNetFactory.CreateInstance(“System.Windows.Forms.CheckBox”, “System.Windows.Forms”)
Set MyCheckbox2 = DotNetFactory.CreateInstance(“System.Windows.Forms.CheckBox”, “System.Windows.Forms”) etc
Set MyButton = DotNetFactory.CreateInstance(“System.Windows.Forms.Button”, “System.Windows.Forms”)
With MyForm
.Controls.Add MyCheckBox1
.Controls.Add MyCheckBox2
…..
…..
.ShowDialog
End with
When I run QTP, the form is displayed correctly with all the checkboxes in it. But there is no scrollbar to scroll to the end.
Could you please guide me how to create a scrollbar to this form?
Having the same issue as RK and Shri. The first time I run a test, my form is on top, however, all subsequent test runs (within the same session of QTP) has the form loading in the background. I have MyForm.TopMost = true, but that does not seem to do anything. Any solution?
I have found a crude way of having it show up all the time. In the With (FormName) properties, add .Visible = True which will bring it to the top. However, once you click OK or Cancel the form will become like a static image which cannot be closed during the test. The solution I found was to call FormName.Close() after you’re done using the form.
Thanks Kumar Gupta
M getting a similar issue as RK.
The dotnet factory form is not the foreground window and loads in the background sometimes. I have to do a alt + tab to get the focus on the dotnet form.
Is there a way to use ‘SetForegroundWindow’ or something to bring the focus on the dotnet form
Hi,
I have used DotNetFactory to fetch form and all the components I’ve needed.
I need this form to be closed after 20 seconds automatically, when a user does not press any (OK/CANCEL) button.
Up until that time I need to be able to work with this form. I.e. there is a textbox and I want to be able to write there whatever I want and also I want to be albe to press(OK/Cancel) button.
Is it even possible?
Regards,
PetrS
The issue is if you use it while testing the application, the DOTNET form goes to the background. How do you bring it to the foreground?
There is aquestion to all that can we integrate QTP with any of the existing Open source Test Management tool.
Dit any one got chance to work on it.
Hi Pallavi ,
The solution to ur problem is already there in the .netfactory part 3 .Refer to that solution is there.
Thanks
Manpreet
Hi Pallavi,
that wont be possible without closing the Form. Adding event is not supported.
Can i use custom font and font size for the form.
I am trying it but its not working.
Thanks In Advance
Manpreet
Hi Saket,
Its working fine .
There was some issue with the image.
Thanks a lot.
Hi Saket,
Many thanks for the reply.
Executing the above code is giving me a cossed box but the image is not there.
Please help me out.Do it take image of any particular format.
wating for a Reply from you
Thanks
Manpreet
Hi Ankur,
Using DotNetfactory, I want to put validations for the form on click of Mybutton.e.g. If Mybutton.Clicked then..
Please show with a sample code how it can be done..and form should not close while showing the validation messages.
Thanks
Pallavi
Manpreet -You can use the Code above to put your image on the form
Set MyForm = DotNetFactory.CreateInstance(“System.Windows.Forms.Form”, “System.Windows.Forms”)
Set MyImage = DotNetFactory.CreateInstance(“System.Windows.Forms.PictureBox”, “System.Windows.Forms”)
Set MyImageSize = DotNetFactory.CreateInstance(“System.Windows.Forms.PictureBoxSizeMode”, “System.Windows.Forms”)
Set Pos = DotNetFactory.CreateInstance(“System.Drawing.Point”, “System.Drawing”)
Pos.X = 10
Pos.Y = 20
MyImage.ImageLocation = “”
MyImage.Location = Pos
MyImage.SizeMode = MyImageSize.Autosize
MyForm.Controls.Add MyImage
MyForm.Show
Hi Ankur,
it will be great if u can help me out . I want to add a add a image on the .net window form using .Net factory.
Please guide me on this .
Thanks
Manpreet
For Dev Kumar Gupta’s example, the following two lines of codes can be used to replace the dialog box display:
Set WshShell = CreateObject(“WScript.Shell”)
WshShell.Popup “Enter environment details”, 2, “Environment Details”
Hi Shaker.
These scripts are specific to QuickTest Professional testing tool.
Hi,
Where do you create this scripts, in VB application? It already has the form build in and just fill in the properties. What is the interpretor? Please let me know because these are really good scripts and I like to use them. I am a little bit new to these.
Thanks,
Sheker
Site is an excellent tool. I would like to see code snippet that combine DP & Dot Net Factory ?
Thanks
use QTP Forums( http://www.learnqtp.com/forums
for all related queries.
Hi Hari,
That would not be possible. DotNetFactory does not directly related or work with .Net object as explained in Part 1 of this series. If .Net plugin is missing then QTP will not able to identify .Net objects in your application under test.
Hi,
Thanks for this valuable information. Site is showing complecated terms in simple manner.
Greate work done..
can we convert those .NET objects which are not properly identified by object repository?
for eg. if .NET plugin is missing and still we want to identify the recorded objects then how can we handle that?
Thanks in advance and I am using QTP version 9.0.
Regards,
Hari
Hi Dev,
What is the functionality of dispose ?Is it same as setting the references to nothing
Create the .NET form object
Set oForm = DotNetFactory(“System.Windows.Forms.Form”,”System.Windows.Forms”)
With oForm
‘Title of the form
.Text = “Enter environment details”
‘Make it the top most window
.TopMost = True
‘Set the startup position a CenterScreen
.StartPosition = .StartPosition.CenterScreen
‘Set the form style as fixed tool window
.FormBorderStyle = .FormBorderStyle.FixedToolWindow
‘Set the size of the window
.Size = GetSize(300,150)
.Show()
‘Displaye the form for a few seconds
Wait 5
‘Close the form
.Close
End With
‘Function to get a Size object
Public Function GetSize(x,y)
‘Create a Size object with constructor int, int
Set GetSize = DotNetFactory(“System.Drawing.Size”,”System.Drawing”, x, y)
End Function
‘——————————————————————————————
‘Function to get a Point object
Public Function GetPoint(x,y)
‘Create a POINT object with constructor int, int
Set GetPoint = DotNetFactory(“System.Drawing.Point”,”System.Drawing”, x, y)
End Function
‘Function to get a Size object
Public Function GetSize(x,y)
‘Create a Size object with constructor int, int
Set GetSize = DotNetFactory(“System.Drawing.Size”,”System.Drawing”, x, y)
End Function
‘X, Y coordinate for a Label
lStartX = 15
StartY = 20
labelWidth = 75
‘Width and height of each control
controlWidth = 160
controlHeight = 25
‘X coordinate of a control in front of the variable
cDelta = lStartX + labelWidth + 10
‘Difference in height between two controls
deltaHeight = 30
‘Create a Label object for the requested user name
Set oLabelUserName = Dotnetfactory(“System.Windows.Forms.Label”,”System.Windows.Forms”)
‘Set the properties of the user name Label
With oLabelUserName
‘Set the Size of the Label
.Size = GetSize(labelWidth, controlHeight)
‘Set the location of the Label on the form
.Location = GetPoint(lStartX, StartY)
‘Text to display for the Label
.Text = “&User Name:”
‘Tab index. Since we are using &UserName
‘When user press ALT + U the label will get the focus
‘But since a label cannot take focus the focus is passed
‘on to the control with a higher tab index
.tabIndex = 0
End with
‘Create an input text box object for the requested user name
Set oTxtUserName = DotNetFactory(“System.Windows.Forms.TextBox”,”System.Windows.Forms”)
‘Set the text box properties
With oTxtUserName
‘name of the text box
.Name = “txtUserName”
‘Size and location
.Size = GetSize(controlWidth, controlHeight)
.Location = GetPoint(lStartX + cDelta, StartY)
.TabIndex = 1
End with
‘Increase the Y coordinate to displace the new controls
StartY = StartY + deltaHeight
‘Create the password label object and set its properties
Set oLabelPassword = Dotnetfactory(“System.Windows.Forms.Label”,”System.Windows.Forms”)
With oLabelPassword
.Text = “&Password:”
.Size = GetSize(labelWidth, controlHeight)
.Location = GetPoint(lStartX, StartY)
.TabIndex = 2
End with
‘Create the text box object for the requested password
Set oTxtPassword = DotNetFactory(“System.Windows.Forms.TextBox”,”System.Windows.Forms”)
With oTxtPassword
.Name = “txtPassword”
.Size = GetSize(controlWidth, controlHeight)
‘Set the password character property. PasswordChar only
‘accepts a char parameter, so convert the * string to a Byte
.PasswordChar = Cbyte(Asc(“*”))
.Location = GetPoint(lStartX + cDelta, StartY)
.TabIndex = 3
End with
‘Increase the Y coordinate for the new controls
StartY = StartY + deltaHeight
‘Create a Label for the requested Environment and set its properties
Set oLabelEnvironment = Dotnetfactory(“System.Windows.Forms.Label”,”System.Windows.Forms”)
With oLabelEnvironment
.Text = “&Environment:”
.Size = GetSize(labelWidth, controlHeight)
.Location = GetPoint(lStartX, StartY)
.TabIndex = 4
End with
‘Create a combo box object for the the requested Environment
Set oLstEnvironment = DotNetFactory(“System.Windows.Forms.ComboBox”,”System.Windows.Forms”)
With oLstEnvironment
‘Name the list box
.Name = “lstEnvironment”
.Size = GetSize(controlWidth, controlHeight)
.Location = GetPoint(lStartX + cDelta, StartY)
.TabIndex = 5
‘Clear all items in the combo box list
.Items.Clear
‘Add items to the combo box list
.Items.Add “Local Environment”
.Items.Add “Testing Environment”
.Items.Add “Staging Environment”
.Items.Add “Production Environment”
‘Set the default as the Testing environment
.SelectedIndex = 1
End with
‘Create the .NET form object
Set oForm = DotNetFactory(“System.Windows.Forms.Form”,”System.Windows.Forms”)
With oForm
‘Title for the form
.Text = “Enter environment details”
‘Make it the top most window
.TopMost = True
‘Set the startup position a CenterScreen
.StartPosition = .StartPosition.CenterScreen
‘Set the form style as a fixed tool window
.FormBorderStyle = .FormBorderStyle.FixedToolWindow
‘Set the size of the window
.Size = GetSize(300,150)
‘Add the controls we just created to the form
.Controls.Add oLabelUserName
.Controls.Add oTxtUserName
.Controls.Add oLabelPassword
.Controls.Add oTxtPassword
.Controls.Add oLabelEnvironment
.Controls.Add oLstEnvironment
‘Show the form as a modal dialog. Code execution will advance to
‘next line after the user closes the form
.ShowDialog()
‘Pause for one second
Wait 1
‘Get the user specified values from each form control
sUserName = oTxtUserName.Text
sPassword = oTxtPassword.Text
sEnvironment = oLstEnvironment.Text
‘Close the form
.Close
End With
‘Dispose of all the .Net objects
oLabelUserName.dispose
oTxtUserName.dispose
oLabelPassword.dispose
oTxtPassword.dispose
oLabelEnvironment.dispose
oLstEnvironment.dispose
oForm.dispose
‘Destroy all of the object reference
Set oLabelUserName = Nothing
Set oTxtUserName = Nothing
Set oLabelPassword = Nothing
Set oTxtPassword = Nothing
Set oLabelEnvironment = Nothing
Set oLstEnvironment = Nothing
Set oForm = Nothing
Print sUserName
Print sPassword
Print sEnvironment
Hi ,
Thank, i have created a form and learn both topics properly.
Regards,
Dev
Hi Ansoo! thnx I have created a form and added a text box and a button (“ok”)..it’s done..but i want to display the message eg:”done” is anyone clicks on the button..so what is the syntax for buton click..
With oForm
.Height =500
.Controls.Add oButton
End with
With oButton
If oButton is clicked then ‘i’m searching for this code..plz help as oButton.Click is not working
display message
End if
End with
Thank you in advance!
I tried and done the code for the display of the list box
Code :
Set oForm = DOTNetFactory.CreateInstance(“System.Windows.Forms.Form”, “System.Windows.Forms”)
Set oListBox = DOTNetFactory.CreateInstance(“System.Windows.Forms.ListBox”, “System.Windows.Forms”)
Set oPoint = DOTNetFactory.CreateInstance(“System.Drawing.Point”, “System.Drawing”, x, y)
oListBox.Location = oPoint
oListBox.Width = 240
oListBox.Height = 25
‘oListBox.Size = oSize
oListBox.Items.Add(“Sreedhar”)
oListBox.Items.Add(“Raghva”)
oListBox.Items.Add(“Gaddam”)
oListBox.Items.Add(“Pavan”)
oForm.Controls.Add oListBox
oForm.ShowDialog
Unfortunately, you cannot.. The DOTNetFactory object is only availble to QTP that enables automation developers to create and use .NET base classes. In other words, the code that you tried to execute can only be executed from QTP.
What do you mean?
Thanks for the information , I am eagerly looking for the next article because recently in one of the interview I was asked to put a list box in the form control to show the user the values to be selected while navigating throught the application,
And slowly we have started… It looks interesting… Good job…
Great read.
I wrote a similar article a while back, and can be found here
Entire DOTNetFactory Series
Can we run this code from a vbs, bcoz its throwing an error
Thanks in advance for any help