This is in continuation with Part 1 of the series on Automating MS word with QTP.
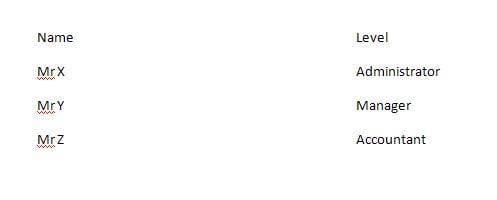
So, by now- you must have got some basic idea on automating MS word. Let us now go deeper into it and see how we can create a table in a word document. A table helps you in aligning text in a word document. Inserting a table also helps in a case when you want to display some kind of information in tabular format. Use “table” method of your doucment to add a table into your doucment and then using cell, you can enter data into the table in specific rows and columns. Following example demonstrates a simple example on how to insert a table in a word document.
- Set oWord = CreateObject("Word.Application")
- oWord.Visible = True
- Set oDoc = oWord.Documents.Add()
- Set oRange = oDoc.Range()
- oDoc.Tables.Add oRange,4,2
- Set objTable = oDoc.Tables(1)
- objTable.Cell(1, 1).Range.Text = "Name"
- objTable.Cell(1, 2).Range.text = "Level"
- objTable.Cell(2, 1).Range.text = "Mr X"
- objTable.Cell(2, 2).Range.text = "Administrator"
- objTable.Cell(3, 1).Range.text = "Mr Y"
- objTable.Cell(3, 2).Range.text = "Manager"
- objTable.Cell(4,1).Range.text = "Mr Z"
- objTable.Cell(4, 2).Range.text = "Accountant"
This gives you a simple tabular display of your data.
 You will notice that, in the above example we have written statements to write data into table every time we need. at the same time we can minimise this if we have our data in a collection or in a datasource coming from the database. In that case we can use a loop and counter for the rows and columns. In the next example you will see how we can do this in a formatted table. by formatted table it means that applying word formatting to your table.
- Set oWord = CreateObject("Word.Application")
- oWord.Visible = True
- Set oDoc = oWord.Documents.Add()
- Set oRange = oDoc.Range()
- oDoc.Tables.Add oRange,1,3
- Set objTable = oDoc.Tables(1)
- objTable.style = "Table Grid"
- strComputer = "."
- Set objWMIService = GetObject("winmgmts:\\" & strComputer & "\root\cimv2")
- Set colItems = objWMIService.ExecQuery("Select * from Win32_Process")
- nRow = 1
- objTable.Cell(nRow, 1).Range.Font.Bold = True
- objTable.Cell(nRow, 1).Range.Text = "Process"
- objTable.Cell(nRow, 2).Range.Font.Bold = True
- objTable.Cell(nRow, 2).Range.Text = "Description"
- objTable.Cell(nRow, 3).Range.Font.Bold = True
- objTable.Cell(nRow, 3).Range.Text = "Path"
- For Each objItem in colItems
- nRow = nRow + 1
- objTable.Rows.Add()
- objTable.Cell(nRow, 1).Range.Font.Bold = True
- objTable.Cell(nRow, 1).Range.Text = objItem.Name
- objTable.Cell(nRow, 2).Range.text = objItem.Description
- if objItem.Executablepath <> "" then objTable.Cell(nRow, 3).Range.text = objItem.Executablepath
- Next
a formatted table looks like below

The above example uses WMI to retrieve the system process information and display the details into the document in a table. For more information on WMI scripting please refer earlier post by Ankur – Windows Management Instrumentaion. Same way the data can be displayed from a data source. Refer earlier post by me … to get the data in a data source from a database.
Till now, we discussed how to create/open a document and write into it. what else can we do in a document? There could be a heavy requirement of searching a particular text/data in the document. Word has this cool feature inbuilt into it, let us see how easily we can use this. You will need to specify a range within which you want word to search for the specified string. Following example demonstrates how to search a string (“QTP”) in a specified document.
- Set oWord = CreateObject("Word.Application")
- Set oDoc = oWord.Documents.Open("C:\Test1.doc")
- searchString = "QTP"
- For n = 1 To oDoc.Paragraphs.Count
- startRange = oDoc.Paragraphs(p).Range.Start
- endRange = oDoc.Paragraphs(p).Range.End
- Set tRange = oDoc.Range(startRange, endRange)
- tRange.Find.Text = searchString
- tRange.Find.Execute
- If tRange.Find.Found Then
- msgbox "Word found in the document"
- End If
- Next
- oDoc.Close
- oWord.Quit
- Set oDoc = Nothing
- Set oWord = Nothing
In the next part we will see how to compare two documents and other important examples which can be used.


Hi,
I have written code to capture web page screenshots to a .bmp documents. But i want to capture all the screenshots from each .bmp file to a single word document. Can anyone help on this?
I want to search for a string on an opened word document. Please help me. In your example you are opening word document and performing a search. In my requirement, word document is opened upon clicking a link. I need to check for a particular string in the document. Appreciate everyone for helping/guding me.
How to verify the fields in header in ms word document??
Paragraphs object is not recognizing.
Error Message:
Object doesn’t support this property or method: ‘Paragraphs’
sorry i missed adding code in my prior post. Here is it:
Window(“Microsoft Word”).WinObject(“oWord”).ActiveDocument.Save
Window(“Microsoft Word”).WinObject(“oWord”).Quit
Hi Saket,
My application is combination of web (.Net) and client (Modified version of MS word). The web part invokes the word and user edits the word as needed. I need to automate this scenario. I tried using above code to insert the table in ms word but having trouble. I was trying to use below code and getting error message” method is not supported”. Please advise. I am stuck..
Thanks
Padma
Correction: replace oDoc.Paragraphs(p).Range with oDoc.Paragraphs(n).Range as shown below
Set oWord = CreateObject(“Word.Application”)
Set oDoc = oWord.Documents.Open(“C:\Test1.doc”)
searchString = “QTP”
For n = 1 To oDoc.Paragraphs.Count
startRange = oDoc.Paragraphs(n).Range.Start
endRange = oDoc.Paragraphs(n).Range.End
Set tRange = oDoc.Range(startRange, endRange)
tRange.Find.Text = searchString
tRange.Find.Execute
If tRange.Find.Found Then
msgbox “Word found in the document”
End If
Next
oDoc.Close
oWord.Quit
Set oDoc = Nothing
Set oWord = Nothing
Hi Ankur,
Can you please give the solution for below issue.
I am comparing two word file, if both the file are same then i want to display the message as pass Else want to save the difference content in new file.
below code is working fine but how to put in a condition.
Dim Doc1, Doc2, oWord,oCompared
Doc1= “C:\Test1.doc”
Doc2= “C:\Test2.doc”
set oWord = createobject(“Word.Application”)
oWord.Visible =true
set oCompared = oWord.Documents.Open(Doc2)
oCompared.Compare(Doc1)
oCompared.Close
thanks in advance.
Regards,
Gkp
H Ankur,
Can u please let me know the difference between .bdb and .mtr. I am little bit confised
H Ankur,
Zan u please let me know the difference between .bdb and .mtr. I am little bit confised
hi der,
i was just wondering how important dese qtp certifications are? ive 3 yrs of exp in testing and has worked on qtp for 2yrs or so……am actually to willing to switch …….doing dese certification will help me???? pls help…
Hi, I have done with all the examples but not with the Findstring. will you please elaborate the process.
Thank you.
Thank you Ankur.
I am looking for part 3 on Automating word document.